Share
Pin
Tweet
Send
Share
Send
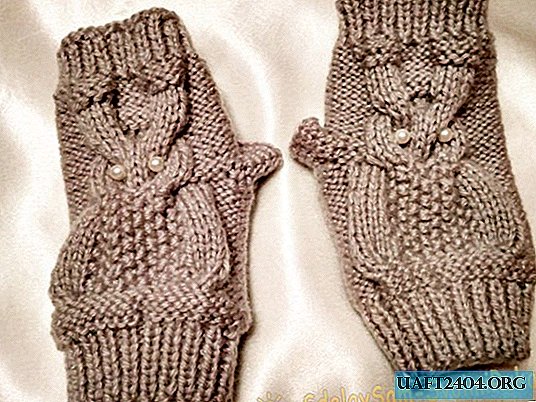
When knitting, yarn was used in large skeins, without marking. Most likely, it is half-wool (50/50 percent, wool / acrylic).
The thread is thin, twisted from two even finer ones. In the knitting itself, double folding of the thread (of two balls) was used. A total of 150 g of gray-gray yarn was spent. Knitting needles long twin 2 mm and 3.5 mm.
Mittens with an owl can also be knitted on 5 (stocking) knitting needles, but only two knitting needles worked in this MK.

On knitting needles 2 mm, dial 36 loops + 2 hem (= 38 p.)
We knit a 1x1 elastic on them (rapport: one front, one wrong side).
Elastic band knit 9 rows.
In the 10th row, add 6 loops evenly (= 42 p + 2 chrome.).

Next, switch to 3.5 mm knitting needles (straight or circular, it doesn’t matter).
Knit 4 rows: in the front rows - wrong loops, from the inside - facial loops (wrong surface).


Further knitting goes according to the pattern of the Owl pattern.
For the pattern, select 18 p. In the middle of the available loops. The extreme loops continue to knit with the wrong side.
So: 1 chrome, 12 p. Purl., 18 p. On the Owl pattern, 12 p. Purl., 1 chrome.
At the level of the second braid (17th row), close 5-6 loops on the right side of the Owl pattern. This will be the thumb hole.
Knit three loops, close 5-6 p., Then continue knitting according to plan.

From the wrong side, we put 5-6 loops on the right knitting needle above the thumb hole, as many as they were closed in the previous row.

In the next front row, these thrown loops are knitted according to the drawing - on the wrong side, and on the inside - the front ones.

In this way, a thumb hole is formed.
In the photo - a finished pattern.

On all loops, knit 4 rows of wrong side.
Go again to the 2 mm knitting needles and knit with an elastic band 1x1.
In the first row of elastic, remove evenly (knit together 8 times in two loops) 8 loops.
Next, knit 6-8 rows with an elastic band.
How many rows of gum to tie depends on how long the mitts are necessary for you personally, how much you want to open your fingers.
In this model, only the extreme phalanges of the fingers will be open.

Close all loops.

Take a needle with a thick eye.
Sew the edges of the mitts with a knit stitch.

View of the mitts from the palm.
If you are annoyed by this seam in the middle of the mittens, then knit on stocking knitting needles. It will turn out a seamless canvas.

Half-finished view of the mitts. Owl is very reminiscent of an owl.


We finish tying the thumb. Crochet 3.5 mm around the circumference of the hole to knit 4 rows of single crochet. The finger will also be open only partially.

In the left arm mitten, the hole for the thumb is formed to the right of the Owl pattern, and for the right mitten, the hole will be to the left of the pattern.


View of the right mitten.
You can snap the thumb before stitching the edges of the product.
Sewing buttons or beads are eyes.

The mitten is finished.


The dimensions of the product in a straightened form to calculate the density of knitting.
Elastic band: 36 p + 2 chrome = 15 cm
The main part: 42 p + 2 chrome = 20 cm.

Mittens knit quickly enough - a couple of evenings of very leisurely knitting. Ideal for not too frosty winters. In exceptional conditions, of course, better mittens are more serious.
Needlework with pleasure!
Share
Pin
Tweet
Send
Share
Send

