Share
Pin
Tweet
Send
Share
Send
To make a certificate folder, you need to take:
• Two blanks from binding cardboard measuring 20 * 30 cm;
• Children's paper for scrapbooking, sheets 30 * 30 cm;
• White cardboard;
• Sintepon sheet;
• Pink fabric with a pattern of 100% cotton;
• Chipboard "Birth Certificate";
• Picture with a girl;
• Cut down white napkin;
• A circle cut down with a diameter of 9 cm;
• Pink ribbon with pompons;
• Knitted flower of pink color;
• Button fabric pink with polka dots;
• Paper and fabric flowers of pink and white;
• Lace;
• Polymer flowers;
• A narrow satin ribbon of pink color;
• Floral hole punch;
• Rep letka light pink with polka dots;
• Cabochons rose burgundy;
• Stationery glue, PVA glue;
• Pencil, stationery clips, scissors, ruler;
• Double-sided tape;
• Stationery knife;
• Glue gun.

We take the binding cardboard, put it next to each other at a distance of 1.5 cm from each other, between them we will paste white cardboard. We cut a strip of cardboard 4 * 30 cm. Divide the strip in a width of 1.5 cm, 1 cm and 1.5 cm. Draw bending lines.


Spread on the sides with clerical glue and glue between blanks from binding cardboard. In the center we get a space of 1 cm. We glue strips of double-sided tape on both sides of the cover.


Now glue the synthetic winterizer. We smooth the fabric very well with an iron so that there is not a single fold, we apply the cover, we make a margin for the turn of 1.5-2 cm around the perimeter.


Wrap the fabric and glue it to the cardboard.


Now flash the entire cover on the typewriter around the edge. With a knife, carefully cut off the excess tissue.


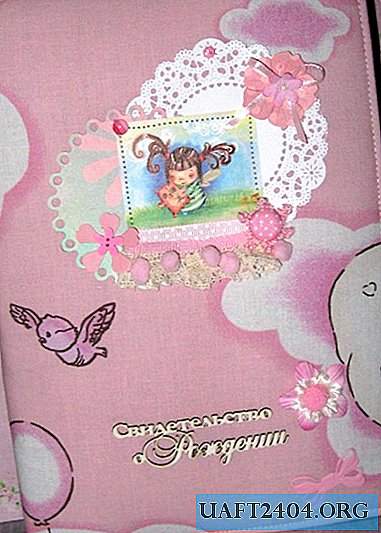
By double-sided tape, we glue a napkin and a circle from the felling to the fabric, and we glue the picture on them. We flash the picture on a sewing machine.


From scrapbooking paper we prepare the interior decor.


From different sheets of scrapbook paper we cut out two rectangles of 19.5 * 30 cm, 23 * 30 cm. First, glue one sheet of paper with glue, smooth it with gauze and press it. First, glue the larger rectangle, which is overlapping.


Now we smear the second side and paste the second rectangle.


Smooth and leave the cover half open. For pressing and fixing we use stationery clips.


From the remaining sheet of paper, cut out a rectangle for a pocket, make it floral on top. Glue PVA pocket inside the folder with glue. We also glue other punch strips.


We tie a bow, cut the ribbon. Glue the decor on the cover. The result is such an interesting cover for a newborn girl! Thank you and good luck to everyone!


Share
Pin
Tweet
Send
Share
Send